UsaFishBox
Welcome to USAFishBox! You are currently viewing the forum as a guest. To view the index and portal you must be a member. Please click the register button to join NOW for FREE.!..Finally check out the 24 hour live chat !!!
UsaFishBox
Welcome to USAFishBox! You are currently viewing the forum as a guest. To view the index and portal you must be a member. Please click the register button to join NOW for FREE.!..Finally check out the 24 hour live chat !!!
UsaFishBox
Would you like to react to this message? Create an account in a few clicks or log in to continue.

UsaFishBox

USA Fishbox is THE place where fish freaks come together. Here at USA we talk aquatics all day long. If you are new please sign up and join in.
 
facebookForumHomeLatest imagesLog inRegister
Welcome to USA Fishbox. If you are a guest please sign up. This forum is 100% free to use.
Similar topics


 Strikingthematch DIY Sump

Go down 
5 posters
AuthorMessage
strikingthematch
Captain
Captain
strikingthematch


Posts : 1118
Location : Virginia Beach, VA
Favorite Fish: : Discus, Stingrays, Arowana, Rams, and Angels

sump - Strikingthematch DIY Sump Empty
PostSubject: Strikingthematch DIY Sump   sump - Strikingthematch DIY Sump Icon_minitime4/9/2011, 11:51 pm

Hello again everyone!

Well as some of you know I always have some kind of project on hand and this time I will be making a wet/dry filter for a future 125 gallon tank I will be setting up in the next few weeks. It will be a fresh water tank used to hold Discus. I know that sumps for freshwater are not as common but based off the positves that a wet/dry filter provides I think they would work great.

My goals are:

1.Increase water volume
2.Maintain steady water quality
3.Have a place to add peat in order to lower my PH
4.Simple and cheap $$$

So far I sit at the planning stages and looking at all my options. As of right now I am leaning towards the use of a larger plastic container mainly due to the fact that I already have an external little giant water pump that I could use as a return pump but don't want to drill a tank.

That being said I will either make or buy an overflow box (again not drilling any tanks here)
My real questions come in here is what should the actually filter section look like? I have seen countless renditions of this all over the internet but I turn to the great minds of the box for further inputs!

I have seen a design that uses plastic drawers. The filter media is placed inside the drawers and the water runs through them (holes drilled between them) then a gap is left in the bottom and flow over the bottom of the tank (good spot for peat?) then in some cases baffles are added to increase water level and finally a return pump.

So as I said before questions are:

How to house media?
What type of media to use/works best?
Peat placement?
Any design ideas/drawings are welcome. I want to have everything setup before starting this project. Once it gets going I will keep everyone updated and hopefully provide images to go along!

Thanks
Striking


Last edited by strikingthematch on 10/9/2011, 5:11 pm; edited 2 times in total
Back to top Go down
majesticaquatic
USA Fishbox Sponsor
majesticaquatic


Posts : 53
Location : Southern Cali
Favorite Fish: : Discus, Tangs, Clownfish

sump - Strikingthematch DIY Sump Empty
PostSubject: Re: Strikingthematch DIY Sump   sump - Strikingthematch DIY Sump Icon_minitime4/10/2011, 12:49 am

I would pack the sump full of drift wood just like you would live rock on a SW tank.
Back to top Go down
texascichlidlover
Private
Private
texascichlidlover


Posts : 11
Location : south austin TX
Favorite Fish: : herichthys carpintis

sump - Strikingthematch DIY Sump Empty
PostSubject: Re: Strikingthematch DIY Sump   sump - Strikingthematch DIY Sump Icon_minitime4/19/2011, 5:27 pm

Ill share some of my freshwater sump experience with you but keep in mind i do NOT do discus at all, even though they are really beautiful! I have used a few different set ups with my fresh water sumps. Like you said before increased water volume and places to store things you do not want to see. The common clear plastic sliding shelf device works well because it is so versatile.. I use a home made tower with an egg grate bottom just above my water level to store my bio balls or pot scrubber alternative.. Above that i can store chemical filtration or crushed rock what ever i would like and i can change it if the need arises. and above that i use a polly fill that i get from walmart in a huge bag for like 4 dollars and it last me for months, draw back is that it is not reusable, but at that price who cares.. the main thing that i like about the large plastice tubs is the price.. if you are wanting to fill a large space with driftwood or peat or what ever a 50 gallon tub from a store is under 20 dollars. It is also alot more forgiving when you have an oops than glass is. but a plastic container will bow if not supported and over filled.. another thing to keep in mind is that a tank with a sump typically is a little cooler and a larger heater might be needed to keep your fish in their happy zone. I have always used drilled tanks for my overflow even going was far as drilling them my self or having them drilled by someone who has done it before.. If you go with a hang on overflow box just make sure to research the possible problems.. All that said i will not set up a large aquarium with out the aid of a sump for my fresh water i just love the versatility ease once set up and the ability to use cheap media. Hope some of that helped and you can always set up your sump out side and run it with a hose to see if the set up you chose will work how you planned, catch leaks, etc.
Back to top Go down
strikingthematch
Captain
Captain
strikingthematch


Posts : 1118
Location : Virginia Beach, VA
Favorite Fish: : Discus, Stingrays, Arowana, Rams, and Angels

sump - Strikingthematch DIY Sump Empty
PostSubject: Re: Strikingthematch DIY Sump   sump - Strikingthematch DIY Sump Icon_minitime4/19/2011, 5:54 pm

Thanks for your input!

I have nearly completed the sump setup and will have to post some pictures here shortly.

I ended up using a 55 gallon tank. I found some nice 1/4 Plexiglas to use as baffles for the sump. Picked up some stack-able containers and drilled holes in those. All my bio media will sit in the containers and flow down through the first parts then the middle will be where I will likely add some plants later. For now it will house two Eheim Jager 300watt heaters.

I then drilled the side of the tank and added an external pump to that.

Lots of room left for expansion of different needs and gives me the ability to change things around.

I will post pictures and do a full write up when I finish with the sump.
Back to top Go down
texascichlidlover
Private
Private
texascichlidlover


Posts : 11
Location : south austin TX
Favorite Fish: : herichthys carpintis

sump - Strikingthematch DIY Sump Empty
PostSubject: Re: Strikingthematch DIY Sump   sump - Strikingthematch DIY Sump Icon_minitime4/19/2011, 6:13 pm

wow thats exactly what i would have done!! lol i really like the idea of plants in a sump its just such a good idea especially if you have plant killing fish like i do.. cant wait to see the pics! How did you go about drilling you tank? Reason i ask is because i watched 2 a 55 and a 20 long get busted last week... OH and one more.. why the external pump vs an internal pump??? i have always gone with internal because my moto is if it works try it again and again. Thanks!
Back to top Go down
strikingthematch
Captain
Captain
strikingthematch


Posts : 1118
Location : Virginia Beach, VA
Favorite Fish: : Discus, Stingrays, Arowana, Rams, and Angels

sump - Strikingthematch DIY Sump Empty
PostSubject: Re: Strikingthematch DIY Sump   sump - Strikingthematch DIY Sump Icon_minitime4/19/2011, 6:34 pm

I'll post further info in the write up but I just used a power hand drill and a diamond dust hole saw. I admit it was very nerve racking at first because I did not know for a fact if the glass was tempered or not. Lucky for me it was not. Just have to go slow and use plenty of water.

I used an external pump mainly because I already had one. I got a CL deal on a little giant pump worth about $150 for $30. So instead of buying an internal pump I spent about $30 on a hole saw and bulk head.
Back to top Go down
strikingthematch
Captain
Captain
strikingthematch


Posts : 1118
Location : Virginia Beach, VA
Favorite Fish: : Discus, Stingrays, Arowana, Rams, and Angels

sump - Strikingthematch DIY Sump Empty
PostSubject: Re: Strikingthematch DIY Sump   sump - Strikingthematch DIY Sump Icon_minitime4/23/2011, 5:06 pm

OK so as promised here are the build photos and a little of a in the making story.

As stated in the original post I wanted to add this as a FW sump to increase water volume and stability. If anyone has ever thought of doing this I will say that it was fairly easy. I will admit that I am a handyman when it comes to projects like this but it was well within the reach of anyone willing to try.

On with the build!
First gather materials...

Old 55 gallon tank (free off CL, Price varies with luck!)
Sheet of Plexiglas/Acrylic 1/4 thick but less would work (free from work)$20 at HD
Stackable containers (Wal-Mart special $4.50 a tote=$18 total)
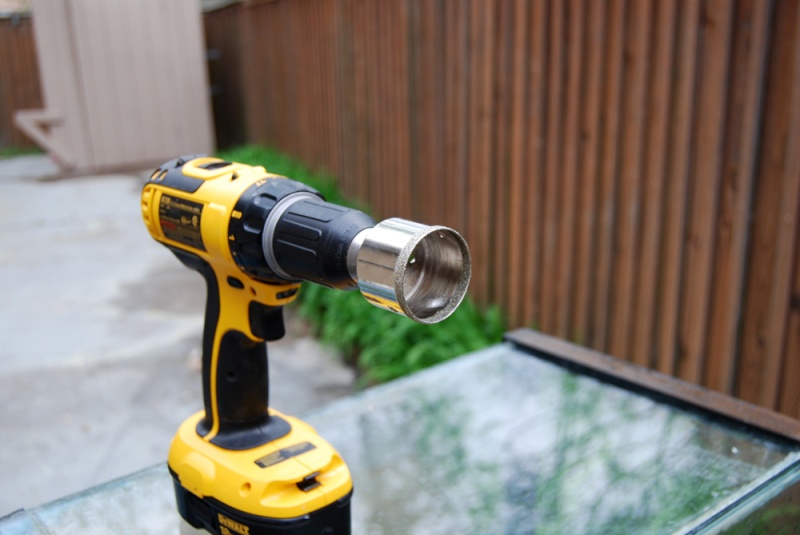
1 3/4 in Diamond hole saw ($15 from glass-holes)
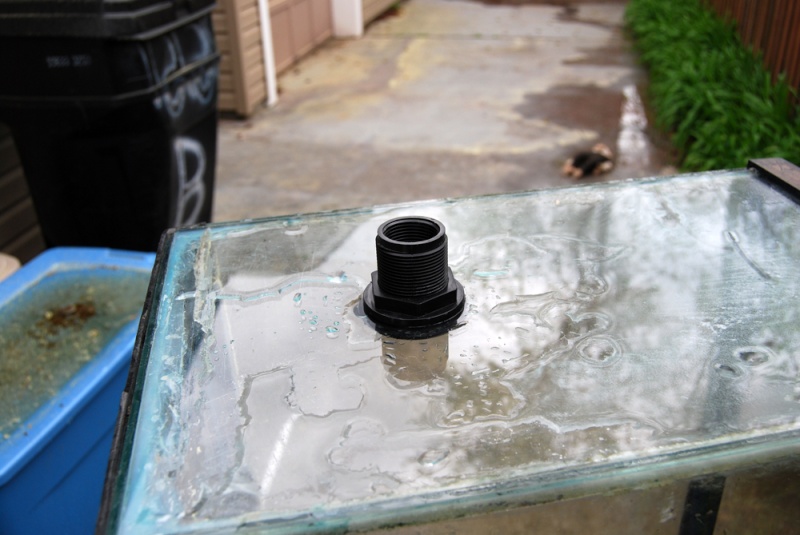
1 Inch Bulk head ($5 from glass holes)
1 inch PVC pipe ($3 from HD)
Misc PVC items ($10 from HD)
GE 1 Silicone x3 tubes ($18 total)
Little Giant return pump 2-MDQ-SC ($30 of CL **most expensive part normally**)
Overflow box $50 off CL (normally 65$ or you can make your own)
x2 300 watt Eheim Jager heaters ($60 total)
Some egg crate I had laying around ($5-10 at HD in light section)
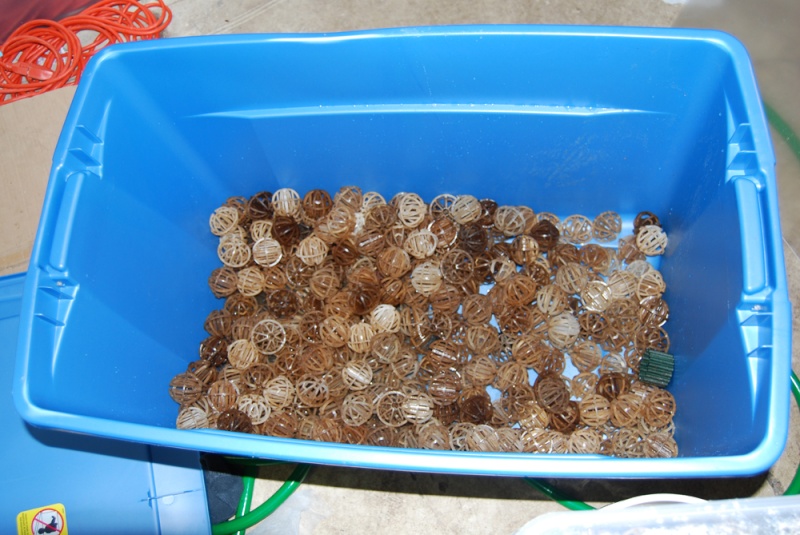
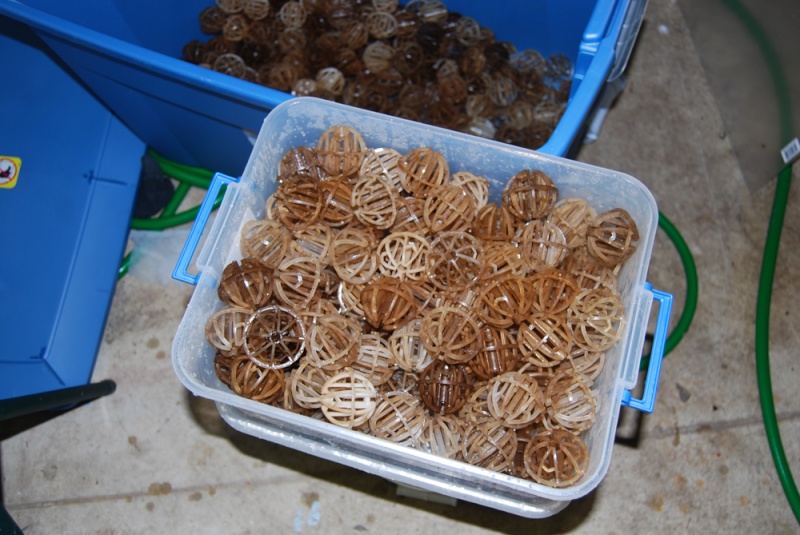
and finally the bio-balls, I worked out a deal with the LFS that has a huge mess of these things cycled to buy them from their "used" stock. It cost me $75 total for these ready to go bio balls... now I know what your thinking! thing is I needed this sump up and running as soon as possible since I have fish being held by a friend who is looking to off load them as soon as possible...

You could also use pot scrubbers here, I found mixed reviews on them but believe they would work just as well.

Anyways I got half of a 35 gallon tote full for that price which when compared to a fresh batch is still saving a decent amount...

SO in total I have $284 invested in the sump. Now I will say this... Given that price tag it is getting close to some of the pre-made ones online but their size is much smaller and often without the bio-balls and pump.

OK on to the good stuff!

First before I got started I waited on the hole saw to arrive--ordered Sunday got Tuesday!
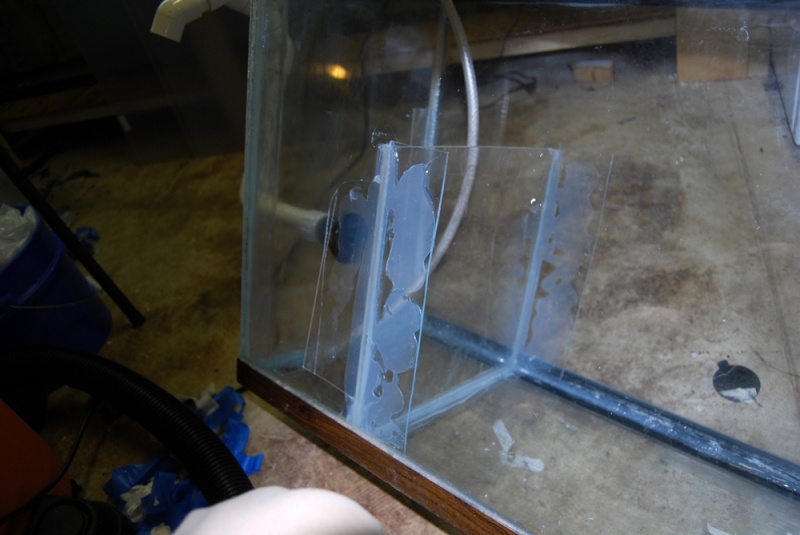
First time I have ever drilled a tank so this was a tense moment for me.
Turn on the hose get a decent flow going. Pick the spot on the glass where you want to hole and attach the hole saw to a good power drill (Dewalt 18V works for me)

Start at close to a 45 degree angle to get a notch started. As the notch deepens slowly tilt the drill upright. There is no pressure needed while doing this! the weight of the drill is more then enough to push down. You are grinding through the glass not cutting so just keep that in mind. The faster you go the hotter the bit gets and the less life span it has... so easy does it.
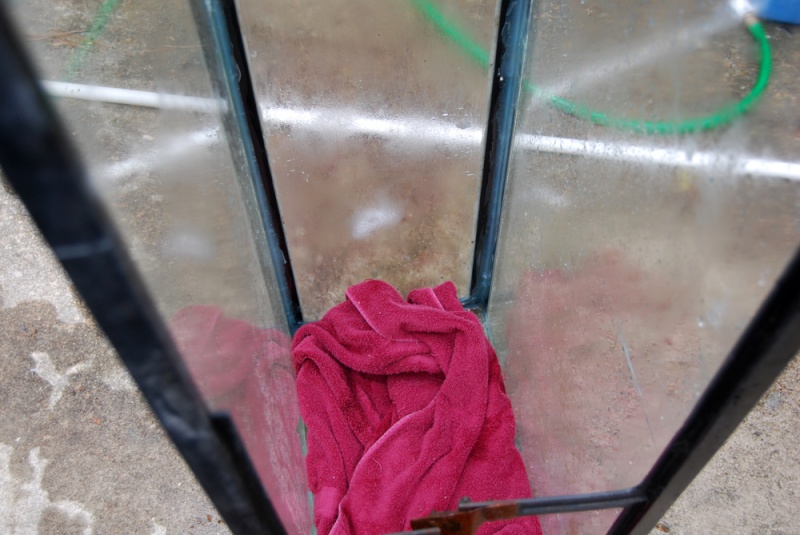
You will see I placed a towel at the bottom of the tank to catch the glass cutout, don't forget this step it would be horrible to successfully cut through your tank only to shatter the other side with the cutout!

sump - Strikingthematch DIY Sump 04152010

sump - Strikingthematch DIY Sump 04152011

sump - Strikingthematch DIY Sump 04152012


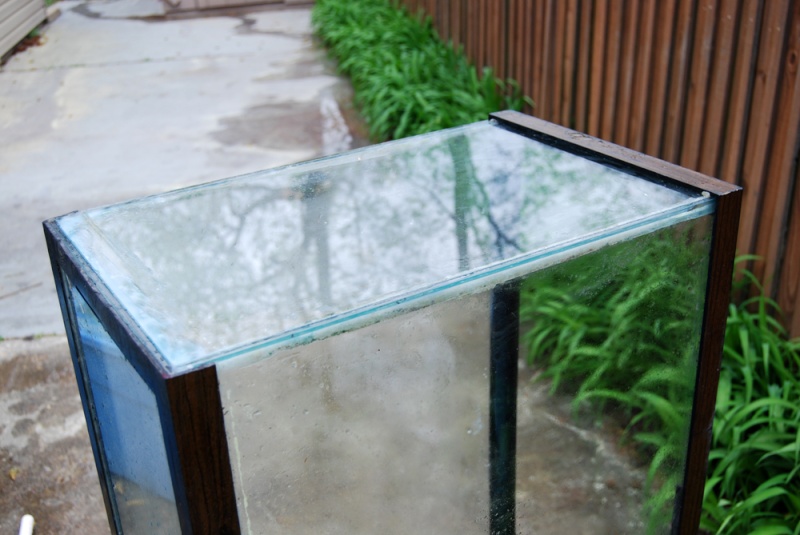
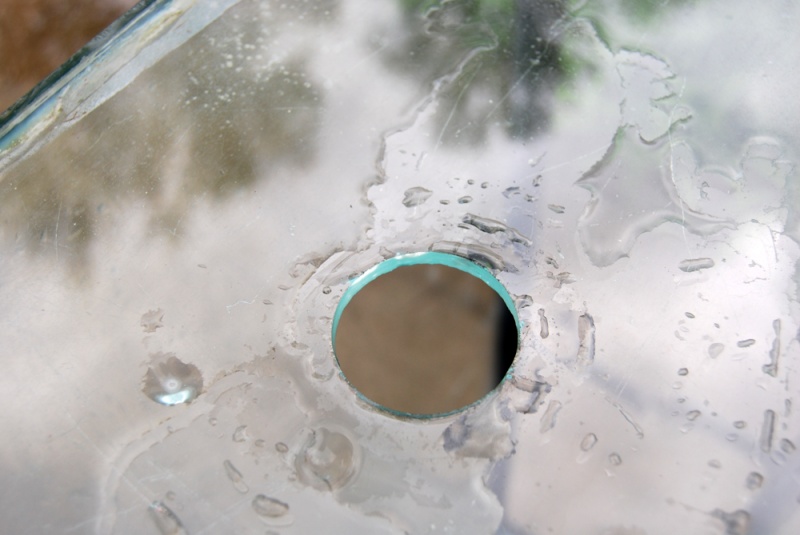
So hole is cut out and everything look great!
Now install the bulk head!
Easy fit and the rubber gasket provide all the protection I need.

sump - Strikingthematch DIY Sump 04152013

sump - Strikingthematch DIY Sump 04152014

Now that I know the tank has not cracked and everything is going well it is time to reseal this only tank. I don't have many pictures of this but I took a razor blade and scraped off the old beat up silicone lining, cleaned it extremely well and then tapped everything off. Once tapped off simple run a bead of silicone down the seem and gently smooth with your fingers. **Remove tape quickly after putting down silicone or it with become part of the tank haha***


So I went to Wal-Mart and picked up my containers they are fairly cheap and have locking lips. I ensured they where stackable.
Took a 1/4 drill bit and made hole aligning the bottom of one tote with the top of another.


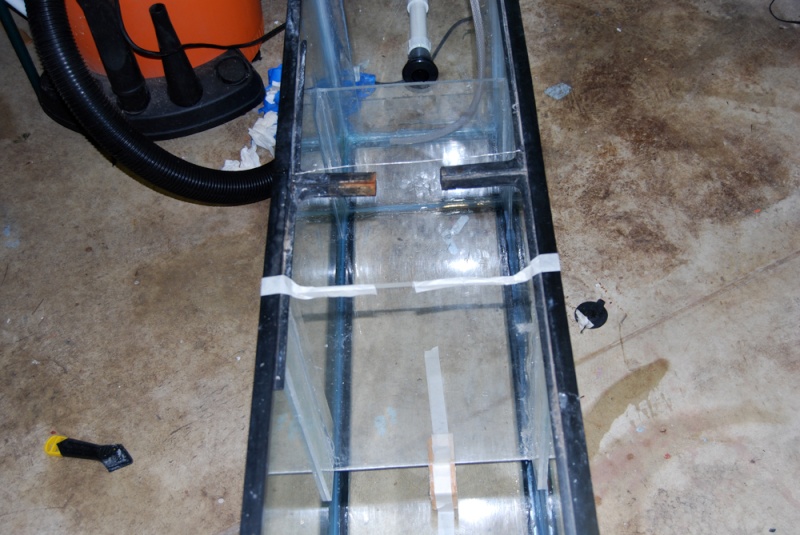
Now that I know how big the totes are I put in a sheet of Plexiglas to act as a baffle in the sump. This first one run from the top to 2 inches above the bottom of the tank. This baffle forces water to flow down through the totes and under it minimizing bypass.
(Tape and wood block used to hold the sheet where I wanted it while silicone dried)

sump - Strikingthematch DIY Sump 04162010

sump - Strikingthematch DIY Sump 04162011

sump - Strikingthematch DIY Sump 04162014

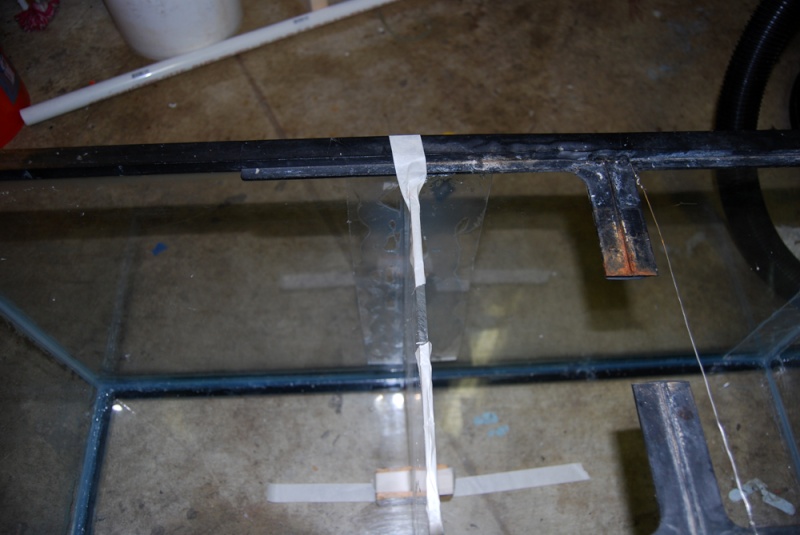
Next is another baffle before the pump. This serves a few purposes. It determines the water level in the sump provides another spot for aeration of the water and makes a constant level in the middle of the sump. This middle spot is where the heaters or another misc equipment can be put. It may be made into a planted sump later.

sump - Strikingthematch DIY Sump 04162012

I placed small strips on either side of the sheet against the glass to provide a better seal and to make sure the silicone would not give way under pressure.

sump - Strikingthematch DIY Sump 04162013

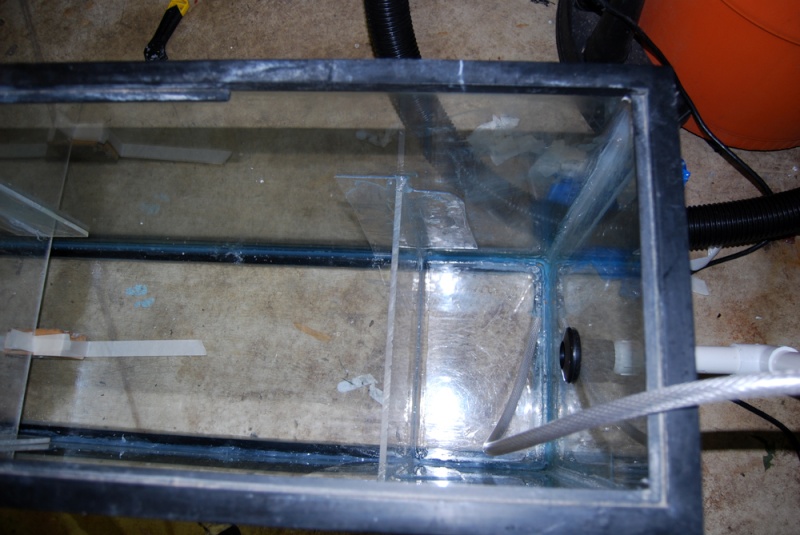
Next I cut out the egg crate and placed it in the bottom of the first part of the sump. Then two small 2 inch strips and finally a top for it. It forms a small egg crate box. The totes sit on top of this and the water flows through it.

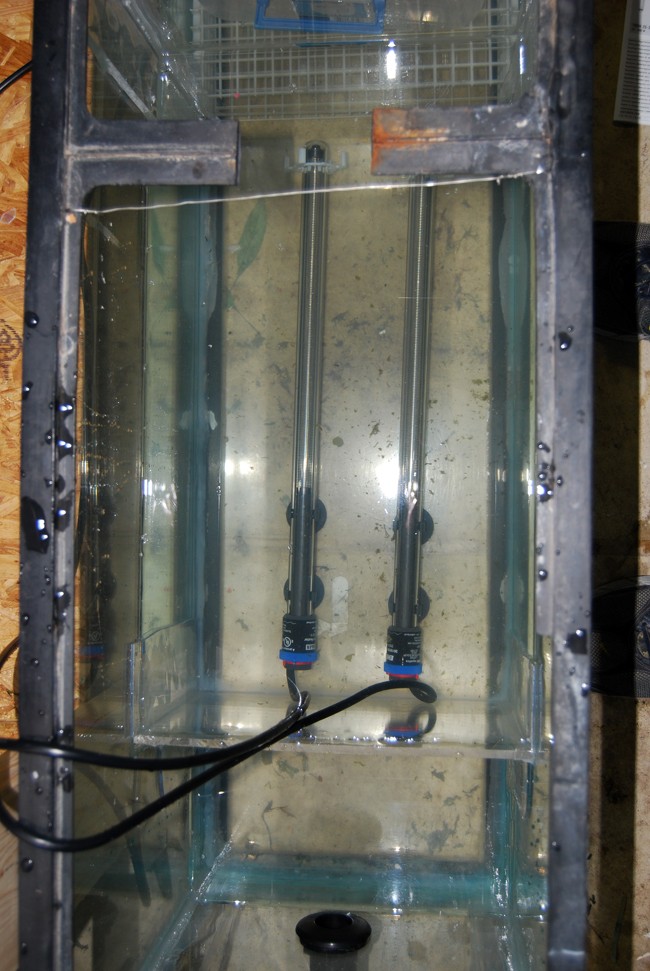
With that done I laid in the totes and made sure everything fit well.

Installed the two heaters. I will say that these heaters are extremely powerful! They keep things within .5 of the desired temp and that is with an open top to the tank and sump!
You could get away with one heater in there but I went with caution on this build and got two for backup and hopefully extended life.

sump - Strikingthematch DIY Sump 04202010

The sump was up and running for a few days before I added the bio balls.
Once I filled the totes I placed them back in the sump and away it went.

sump - Strikingthematch DIY Sump 04202011

sump - Strikingthematch DIY Sump 04202012

With a little tweaking on the flow rates I am able to get close to full pump output. Something around 500+ GPH. The water coming out of the pump is very strong and i will build a spray bar for it to decrease the current it generates.

It has been up and running for a few days and I have to say the thing is an ammonia eating machine. I use pure ammonia to test it's rate of filtration and it can take 3-4 ppm down to trace amount within 6 hours.

If you have ever thought about building something like this I highly recommend it! It was a fun project and while somewhat costly I enjoy knowing I made something!

Best of luck to all you DIY'ers

Back to top Go down
strikingthematch
Captain
Captain
strikingthematch


Posts : 1118
Location : Virginia Beach, VA
Favorite Fish: : Discus, Stingrays, Arowana, Rams, and Angels

sump - Strikingthematch DIY Sump Empty
PostSubject: Re: Strikingthematch DIY Sump   sump - Strikingthematch DIY Sump Icon_minitime4/26/2011, 11:52 am

Well the sump has been up and running for a few more days. The first fish went into the 75 gallon tank it is on for the moment until I can get around to setting up the 125. Anyways I can tell you that this thing will process ammonia like nothing I have ever seen. Still waiting on nitrite to drop completely to 0 but it is very close at the moment.
Back to top Go down
lifeisgood
Captain
Captain
lifeisgood


Posts : 1154
Location : Beaverton , MI
Favorite Fish: : My Favorites are the Pleco's and Cory Cats . BUT , I have 44 running Tanks at this time . I keep 3 kinds of Shellies , several types of Pleco's ( mostly Ancistrus ), Cichlids , Crays , Angels , LB's , and some local species .

sump - Strikingthematch DIY Sump Empty
PostSubject: Re: Strikingthematch DIY Sump   sump - Strikingthematch DIY Sump Icon_minitime4/26/2011, 12:57 pm

Nice job ! Congratz
yes
Back to top Go down
strikingthematch
Captain
Captain
strikingthematch


Posts : 1118
Location : Virginia Beach, VA
Favorite Fish: : Discus, Stingrays, Arowana, Rams, and Angels

sump - Strikingthematch DIY Sump Empty
PostSubject: Re: Strikingthematch DIY Sump   sump - Strikingthematch DIY Sump Icon_minitime4/26/2011, 7:58 pm

Thanks, It took some time for sure but the flexibility I now have as far as adding special things such as bags of Purigen to rid the tank of any Nitrates is great! I have to say I have seen this done on both much smaller and larger scales and at least for the small scale this would be much less costly and easy to do. It could all be contained in a smaller plastic tote!
Back to top Go down
Madmax0r
Staff Sergeant
Staff Sergeant
Madmax0r


Posts : 147
Location : Austin Texas
Favorite Fish: : Texas Cichlids (mainly Herichthys cyanoguttatus), Rock bass, and other native Texas fish


sump - Strikingthematch DIY Sump Empty
PostSubject: Re: Strikingthematch DIY Sump   sump - Strikingthematch DIY Sump Icon_minitime4/27/2011, 2:51 pm

texascichlidlover wrote:
wow thats exactly what i would have done!! lol i really like the idea of plants in a sump its just such a good idea especially if you have plant killing fish like i do.. cant wait to see the pics! How did you go about drilling you tank? Reason i ask is because i watched 2 a 55 and a 20 long get busted last week... OH and one more.. why the external pump vs an internal pump??? i have always gone with internal because my moto is if it works try it again and again. Thanks!


Im the guy who broke the 55 and the 20, using a carbide hole saw. in the past I have always used a slotted piece of metal pipe or an old wood hole saw that had the teeth ground flat. then you can just use loose abrasive to drill it such as a powdered up grinding wheel or actual abrasive for polishing as an alternitive to the diamond hole saw. From what I have seen Im not a big fan of using the actual carbide hole saw.

out of 3 attempts only attempt 2 successfully yielded a hole without cracking. 1 and 3 broke it.

I have drilled 4 tanks in my life, After breaking 2 aquariums last weekend, I came up with an idea that I am now using. I got a 55 gallon at petsmart for 109 dollars. I immedeately took it home and broke one of the side pannels of glass. after removing all the pieces and scraping the silacone off with a razor, I then cut a piece of 3/8'' acrilic to size and drilled my 2 21/2 inch holes in it that I wanted to drill in the glass. I then siliconed it into place where the glass went. It worked great and I can drill as many holes as I want. It looks just like glass and you can't even tell its plastic. If your fairly good at siliconing You won't even be able to tell Its not a brand new tank...

If your pretty good with your hands I highly recomend this option. I probably will never have a need to drill glass again.


To quote someone I didn't really like that much: "Hindsight is always 20/20"


Hope this helps someone avoid a weekend of moderate irritation... lol =)


-Buck
Back to top Go down
Madmax0r
Staff Sergeant
Staff Sergeant
Madmax0r


Posts : 147
Location : Austin Texas
Favorite Fish: : Texas Cichlids (mainly Herichthys cyanoguttatus), Rock bass, and other native Texas fish


sump - Strikingthematch DIY Sump Empty
PostSubject: Re: Strikingthematch DIY Sump   sump - Strikingthematch DIY Sump Icon_minitime4/27/2011, 3:00 pm

maybe one of these days ill stop being a cheap @$$ and get a diamond hole saw... lol
Back to top Go down
lifeisgood
Captain
Captain
lifeisgood


Posts : 1154
Location : Beaverton , MI
Favorite Fish: : My Favorites are the Pleco's and Cory Cats . BUT , I have 44 running Tanks at this time . I keep 3 kinds of Shellies , several types of Pleco's ( mostly Ancistrus ), Cichlids , Crays , Angels , LB's , and some local species .

sump - Strikingthematch DIY Sump Empty
PostSubject: Re: Strikingthematch DIY Sump   sump - Strikingthematch DIY Sump Icon_minitime4/27/2011, 3:09 pm

Madmax0r wrote:
maybe one of these days ill stop being a cheap @$$ and get a diamond hole saw... lol

That would be my option ! Just sayin'
Ray
Back to top Go down
strikingthematch
Captain
Captain
strikingthematch


Posts : 1118
Location : Virginia Beach, VA
Favorite Fish: : Discus, Stingrays, Arowana, Rams, and Angels

sump - Strikingthematch DIY Sump Empty
PostSubject: Re: Strikingthematch DIY Sump   sump - Strikingthematch DIY Sump Icon_minitime4/27/2011, 3:13 pm

Well I will tell you that a pure carbide saw is not really recommended for glass cutting since it is not really resilient enough to stand up to the heat and not wear down quickly.
You have to keep in mind you are not cutting the glass but rather slowly grinding away at it.
The diamond coated teeth hold up to the heat generated while grinding. They are a little more expensive but imo well worth it when you consider the cost of a broken tank.

The process should be done with almost no pressure. You can hear when the saw has too much applied to it.

Lots of water and let gravity do the work for you.

I do like your idea with the acrylic! I think If I would have busted out that end of the tank I would have done the same thing! Great work!
Back to top Go down
Madmax0r
Staff Sergeant
Staff Sergeant
Madmax0r


Posts : 147
Location : Austin Texas
Favorite Fish: : Texas Cichlids (mainly Herichthys cyanoguttatus), Rock bass, and other native Texas fish


sump - Strikingthematch DIY Sump Empty
PostSubject: Re: Strikingthematch DIY Sump   sump - Strikingthematch DIY Sump Icon_minitime4/27/2011, 3:27 pm

thanks!

Im not sure If I would want to replace any of the panes other than either side. the acrylic would need to be too thick to make it work with the edge bands that were designed for glass. not to mention expensive.

ya, diamond is the way to go no doubt.

however if needed the abrasives with a simple piece of slotted pipe does work. People used to drill the hole in they're primary telescope mirror using that method. Its a very slow process tho. Its a poor man's method

The only reason I tried the carbide was someone said it worked great in a forum. and it does work, but I probably wouldn't put it in the great category for sure.

Thanks for the Info everyone


-Buck


Back to top Go down
strikingthematch
Captain
Captain
strikingthematch


Posts : 1118
Location : Virginia Beach, VA
Favorite Fish: : Discus, Stingrays, Arowana, Rams, and Angels

sump - Strikingthematch DIY Sump Empty
PostSubject: Re: Strikingthematch DIY Sump   sump - Strikingthematch DIY Sump Icon_minitime4/27/2011, 3:32 pm

Yeah I know of the pipe method but it still goes along the lines of cost vs risk for me. I spent $15 on a diamond hole saw the carbide ones are a little cheaper and do work but i'd say the failure rate is much more probable.

I agree though anything other then the sides would be much harder to do not to mention not very cost effective. Those darn thick acrylic sheets are expensive!
Back to top Go down
Madmax0r
Staff Sergeant
Staff Sergeant
Madmax0r


Posts : 147
Location : Austin Texas
Favorite Fish: : Texas Cichlids (mainly Herichthys cyanoguttatus), Rock bass, and other native Texas fish


sump - Strikingthematch DIY Sump Empty
PostSubject: Re: Strikingthematch DIY Sump   sump - Strikingthematch DIY Sump Icon_minitime4/27/2011, 4:54 pm

Yea, at work we have a piece of 1 inch acrylic thats 4' by 10' I think they said it was 1200 dollars... lol insane. I think they are going to CNC it into a table. what a waste
Back to top Go down
Sponsored content


sump - Strikingthematch DIY Sump Empty
PostSubject: Re: Strikingthematch DIY Sump   sump - Strikingthematch DIY Sump Icon_minitime

Back to top Go down
 
Strikingthematch DIY Sump
Back to top 
Page 1 of 1
 Similar topics
-
» DIY sump
» sump question
» freshwater sump?????

Permissions in this forum:You cannot reply to topics in this forum
UsaFishBox :: :: Freshwater Aquaria :: (DIY) Do It Yourself Projects-
Jump to: