| | my new tank build |  |
|
+10Raschael ricardorocks CajunGator kfennell timw philuponthepho ilicurtisili nitty KMX lgsasquatch 14 posters |
|
| Author | Message |
|---|
lgsasquatch
Chief Wrnt. Off. 5


Posts : 501
Location : Saginaw
Favorite Fish: : All i can afford
| Subject: my new tank build  11/15/2009, 10:28 pm 11/15/2009, 10:28 pm | |
| After seeing raptors building blog i decided i would do one on my new 55 i got from raptor.  After getting the tank home i looked it over. I wanted to modify the stand to work better for my needs but after looking at it i decided to build a new stand to put it on. Thought that would be easier then modifying the stand that came with it.  I started by building this 2x4 frame. I built it to hold a 75 gallon tank so that i could put it next to the wall and not have a big gap between it and the wall. Later i can get a 75 gallon tank and not have to build a new stand for it. The plan for this stand is to make a hourglass figure stand with a solid wood bottom to put the sump on. I plan on trying to sandblast the canopy so i can clear coat it to make it a light wood color instead of black. I see allot of people having black stands. I will keep you posted on the build. | |
|
| | |
KMX
Admin


Posts : 16094
Location : Mansfield, TX
Favorite Fish: : African Cichlids of all kinds.
| | Subject: Re: my new tank build 11/15/2009, 10:50 pm | |
| Looking good sir. I like to see people taking it to there own hands and doing some DIY projects.  | |
|
| | |
lgsasquatch
Chief Wrnt. Off. 5
Posts : 501
Location : Saginaw
Favorite Fish: : All i can afford
| | Subject: Re: my new tank build 11/18/2009, 9:18 am | |
| Here is an update o the build. I have decided to build a rustic stand to hold the tank, something i have not seen around my part of town. I thought it would be different but nice to have. All i was able to do this week is to add the ruff cedar around the top of the stand. I plan on having another piece of cedar around the bottom of the stand to match the top.  | |
|
| | |
Guest
Guest
| | Subject: Re: my new tank build 11/18/2009, 3:12 pm | |
| nice work igs cannot wait to see it all done  |
|
| | |
nitty
Moderator


Posts : 1906
Location : Houston/Atlanta
Favorite Fish: : Mine:
110gal. Eclectochromis Lobochilus Hertae
56gal. Neolamprologus Brichardi
| | Subject: Re: my new tank build 11/18/2009, 4:09 pm | |
| nothing like a DIY project. | |
|
| | |
lgsasquatch
Chief Wrnt. Off. 5
Posts : 501
Location : Saginaw
Favorite Fish: : All i can afford
| | Subject: Re: my new tank build 11/20/2009, 11:43 am | |
| I have made some progress today on my new stand. I have bought the cedar needed for the canopy and the base. Also have the thin stain grade ply wood for the sides of the stand.  This is only the start of the canopy. I still have to cut the brace to go along the back of the canopy to hold the back together and to support the opening top when i get it built. 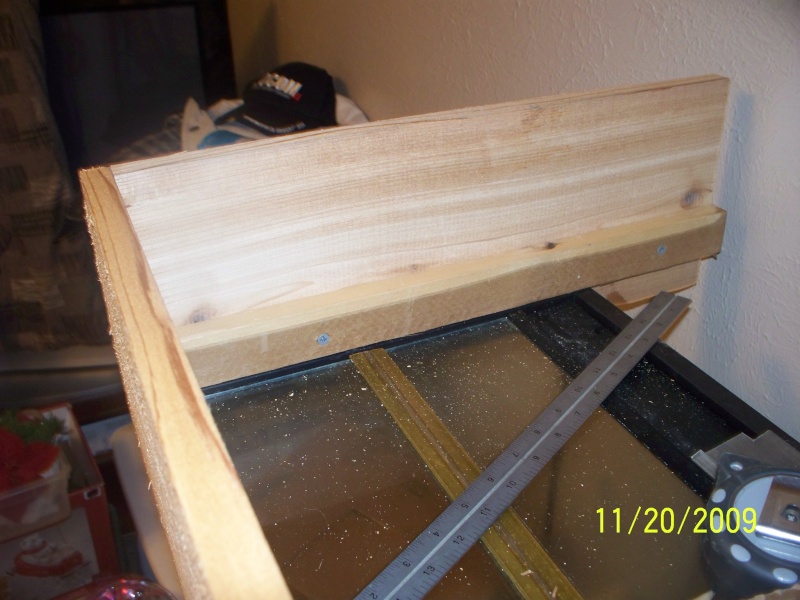 I will work on the brace and the base of the stand later today and update this tonight sometime. After my thumb quits hurting. LOL ( i smashed it will building the top today  ) | |
|
| | |
Guest
Guest
| | Subject: Re: my new tank build 11/20/2009, 12:46 pm | |
| |
|
| | |
lgsasquatch
Chief Wrnt. Off. 5
Posts : 501
Location : Saginaw
Favorite Fish: : All i can afford
| | Subject: Re: my new tank build 11/20/2009, 5:04 pm | |
| I have done as much as i can for few weeks. But it is up and running and waiting for its new tenants now. I have braced the canopy finally. Just have to add the lid to it to complete.  I have skinned the sides of the stand starting to give it the hour glass figure. 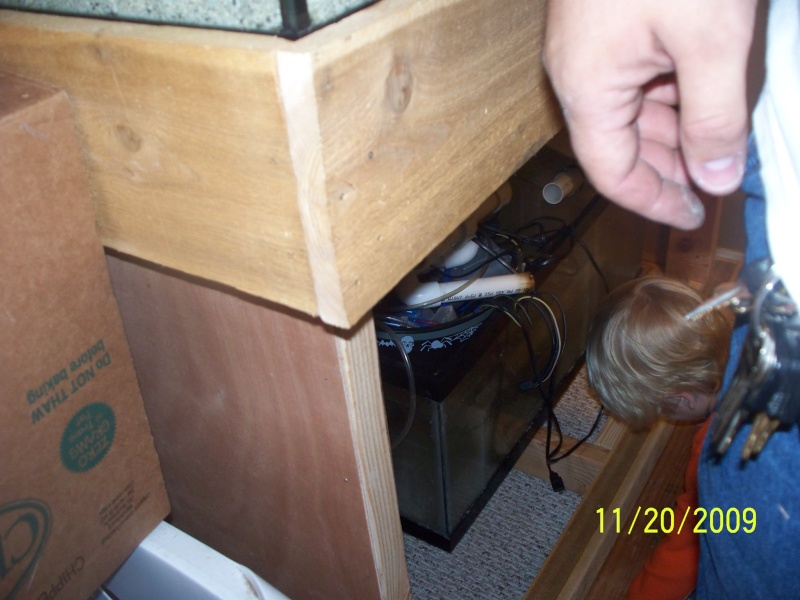  I have finished the cedar around the foot of the stand. 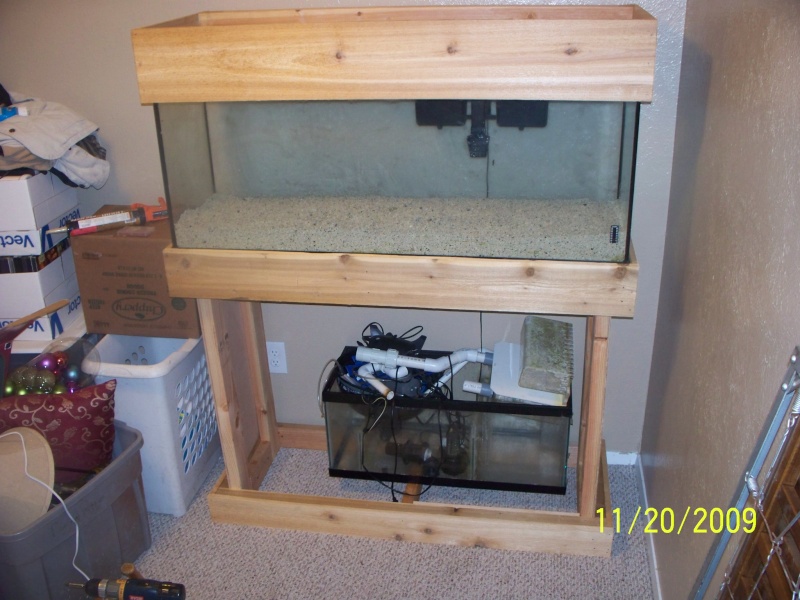 All that is left is to put the bottom shelf in make some doors and make the lid for the canopy. Then i can start adding the decorative touches. | |
|
| | |
Guest
Guest
| | Subject: Re: my new tank build 11/20/2009, 5:06 pm | |
| awesome bro cannot wait until the next installement |
|
| | |
lgsasquatch
Chief Wrnt. Off. 5
Posts : 501
Location : Saginaw
Favorite Fish: : All i can afford
| | Subject: Re: my new tank build 11/20/2009, 7:53 pm | |
| Here is a picture of the tank after i put some decor and a light on it. Needed it for a few fish so i had to set it up before i am done with the stand . At Least the hard parts to get to have been finished.  This is with one 13 watt light, sure wish i could have gotten two of them when i got this one.  | |
|
| | |
lgsasquatch
Chief Wrnt. Off. 5
Posts : 501
Location : Saginaw
Favorite Fish: : All i can afford
| | Subject: Re: my new tank build 11/28/2009, 1:17 am | |
| I have since picked up a bigger tank for this stand. Was told it was a 75 gallon but really think it is an 80 or at least be considered an 80 gallon. Any way it is the tank that will go with the stand if i decide to sell it in the future. The new tank measures 48x18x23 The new tank is reef ready but it only has a drain drilled in the bottom, no hole for a return line. This is making me think some one had it drilled and it did not come this way originally. the tank does have some flows in it but it was a cheap used tank so i think i can deal with some flows. It has some chips on one corner from where it had hit something or something had hit it but i think a piece of corner molding would cover them nicely. 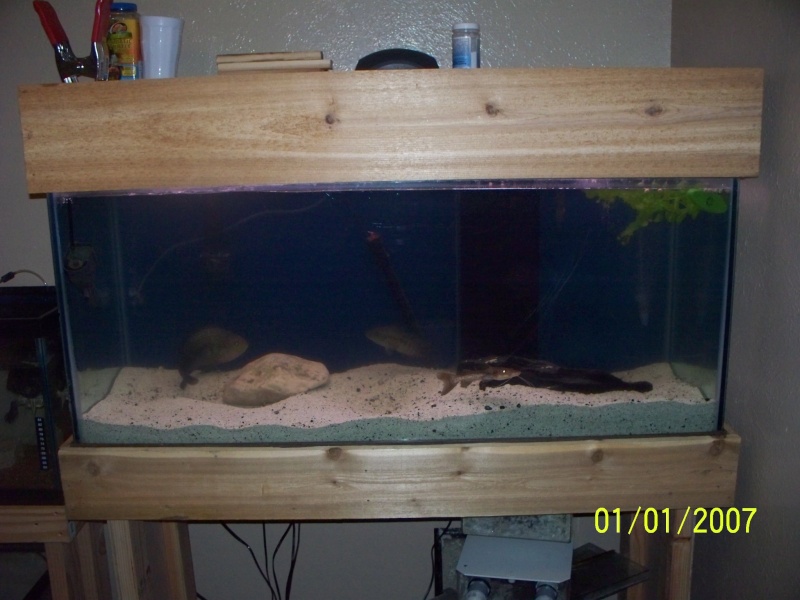 i know what some of you are thinking, why do i have a rr tank for fresh water. i like to use then for the purposes they where designed for minus the salt water and reef. I do not like having all of the things used in aquariums to show inside the tank and by using a rr tank i can run a wet/dry filter, hide most of the plumbing parts out of sight and have the heater in the filter instead of the main tank. Some times this can work to your advantage for example on my 120 saltwater tank i am running 1 300 watt heater and it is keeping the tank toasty worm. by putting it in the filter i am heating the water in the filter and pumping it back into the tank so warm water goes in the tank and flows across it as cold water drains through the overflow box. I have cut down on electric needed to heat the tank and i only had to buy one heater instead of two or three. Know that i have gotten off subject, back to it. I plan on using one of the 20t i have to make a wet/dry filter for this tank so that every thing will be hidden from sight and no more hob filters  I got the first part of this build done fairly quickly and that was because i needed a place to put some of my larger fish i have.( The 20t just wasn't quite large enough for them ) So far i have a 10" jd a 7" jd and a 8" shovel nose catfish in the tank . I will soon have another 6" jd , three 6" plus Texas cichlids and three 6" plus blood parrots. That should be enough to fill the tank once they have grown to there adult sizes. I will finnish the stand after the holidays and will post more pics soon. | |
|
| | |
ilicurtisili
Admin

Posts : 1433
Location : Watauga
| | Subject: Re: my new tank build 11/28/2009, 1:27 am | |
| looking good | |
|
| | |
philuponthepho
Captain


Posts : 1059
Location : Arlington
Favorite Fish: : Anything I can afford (which is $0)
| | Subject: Re: my new tank build 11/28/2009, 12:11 pm | |
| How do you add the lights underneath the canopy? | |
|
| | |
lgsasquatch
Chief Wrnt. Off. 5
Posts : 501
Location : Saginaw
Favorite Fish: : All i can afford
| | Subject: Re: my new tank build 11/28/2009, 2:56 pm | |
| That will depend on the lights you want to use on your tank. This particular set up i have two t-12 witch i can later change out to t-5. It will mount to the canopy by the end caps that the bulb attaches to. I will secure the end caps to the underside of the canopy and then put the reflector and the bulbs back into them and run the wires out one side of the rear of the canopy. I will have pics of it when i get the canopy complete. Hopefully in the next few weeks. | |
|
| | |
lgsasquatch
Chief Wrnt. Off. 5
Posts : 501
Location : Saginaw
Favorite Fish: : All i can afford
| | Subject: Re: my new tank build 1/27/2010, 10:47 am | |
| I have an update on the build. Like i said before i started to use the tank to hold some larger fish i did not want in my cichlid tank, since then the fish have found new homes and the tank has been drained. I have fixed the built in overflow box witch was leaking water through the seals in it and have decided to move my cichlids into the tank. But before i can move the fish i wanted to put a 3d background in the tank. After all the research and ideas i found i have started on a 3d background i like and i think allot of you will like once it is complete.  This is the Styrofoam i am using. It is 1" thick and comes in a 48x96" sheet and is less then $13 a sheet. I am thinking i may need a little more then 1 sheet to complete my background.  I have decided to go with the dry lock method instead of concrete. it takes less time to cure then the concrete.  Here are two of the colors i am going to use on the finished product. I am thinking of getting some brown and gray colors to throw in the mix. This 3d background is being built in stages instead of 1 solid piece to go i the tank. i think it will make it easier to put in the tank and easier to make all of the caves i want to be in it. plus i can make changes as i go with the background.  This is what i have get done so far, just the first four layers of "rock" and it is split by the overflow box so it is in two pieces, a left and right side. I am waiting for the silicone to cure so i can cover it with the dry lock and some color before i start my next section. When it is all complete it will look like it was made into the tank and it will be. No removal of this background it will be a part of the tank for now on. lol P.S. Also by building it in this way it gives me time to figure out my return line from the wet/dry filter so i can incorporate that into my background so it will be hard to see if at all. | |
|
| | |
timw
Corporal/Specialist


Posts : 91
Location : N Charleston, SC
Favorite Fish: : saltwater ones
| | Subject: Re: my new tank build 1/27/2010, 10:56 am | |
| Thats prety nice. How will you seal all the foam and quickcrete? Is it aquarium safe? | |
|
| | |
lgsasquatch
Chief Wrnt. Off. 5
Posts : 501
Location : Saginaw
Favorite Fish: : All i can afford
| | Subject: Re: my new tank build 1/27/2010, 11:41 am | |
| Instead of quickcrete i am using the drylock. It is a latex base waterproofing concrete paint. It will not be as hard as quickcrete but it does the same job. Once it is fully dried it is aquarium safe. | |
|
| | |
kfennell
Private

Posts : 18
| | Subject: Re: my new tank build 1/29/2010, 12:17 pm | |
| Looks like good work so far! | |
|
| | |
lgsasquatch
Chief Wrnt. Off. 5
Posts : 501
Location : Saginaw
Favorite Fish: : All i can afford
| | Subject: Re: my new tank build 1/31/2010, 10:48 am | |
| The back ground is complete... FINALY!! After i finished cutting all of my pieces i started to arrange them in a way i liked and i thought my fish would like and silicone them together.  After the silicone had dried i took the pieces outside and went after them with my hand held torch. I used the torch to soften the ends and make the foam look more like natural stones. I then started to lay the first coat of dry lock to soften the edges a little more.  I made it into 3 pieces for easier installation into the tank. after it was installed i do not think anyone will be able to tell there are three pieces to it.After i finished the first coat or two of the dry lock i did a dry fit to check for clearance issues. I found a few with the build up of dry lock on the foam but nothing a quick fix could not fix. Next it was time for some color to be added. Finally i can see the light at the end of the tonal.. I mixed some of the charcoal cement coloring with the dry lock and laid a nice coating of gray on top of the white base coat on all three pieces. I let it dry for a few hours and went back to do some touch up painting and let it dry for a few hours..OK i may have speed up the drying by using a hair dryer. I hate waiting. After the gray was 95% dried i went back over it with some white using just the ends of the brush to add the detail. I then did the same things to a bolder i had made from some of the scrap pieces of foam i had. Also plan on making some more boulders to get rid of the pill of useful foam i have left. Good project for me and my oldest son to do. Now that the paint had time to dry i can finally install into the tank. I was wanting to run some of the hard plastic airline that you can get form pet smart for around $1.50 a piece. I was going to run the line down the backside of the background in a grove from top to the bottom then out to the front of the background so i could run my air stones without seeing any air line in the tank. But since none of the pet smarts seem to have any in stock i decided to run the air lines a different way.When i figure that out i will let everyone know how i did it to conceal them. 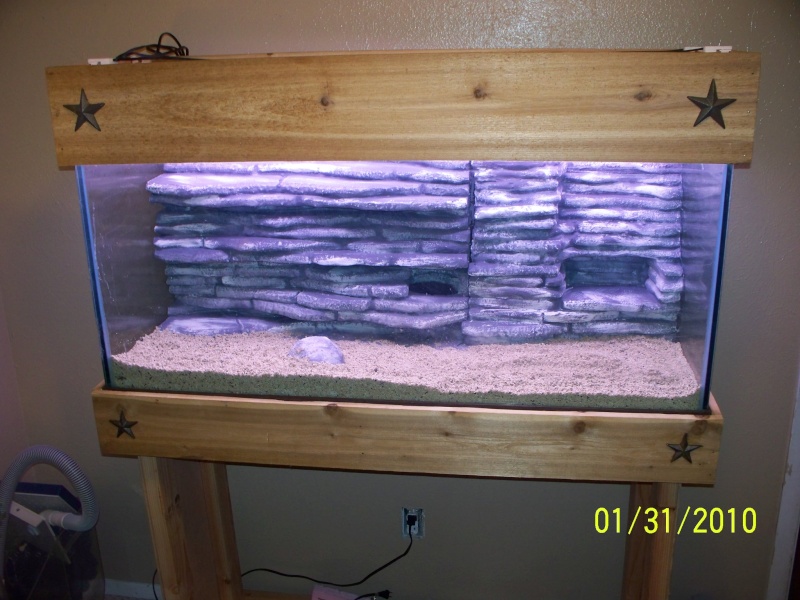   I took these last two pics to try and get some of the details of the rocks. Its hard to see and get that real pic when you are not here in person.  Here is a pic of the top of the bolder i made. I am sure you will be able to see the rest after the cichlids get moved into the tank.  The final setup minus some decor in use in the other tank, and the fish. | |
|
| | |
CajunGator
Moderator

Posts : 5845
Location : New Iberia, Louisiana
Favorite Fish: : Cichlids, WC Syn Petricola, Shellies, Festae, Mbu Puffers, Koi Angels, ABN, Piranha, Mermaids
| | Subject: Re: my new tank build 1/31/2010, 10:54 am | |
| Super ,,, Very Well Done.... BACKGROUND will look awesome in the complete Tank. Biggg projects take time, but when done well, makes a GREAT presentation. CONGRATS... | |
|
| | |
lgsasquatch
Chief Wrnt. Off. 5
Posts : 501
Location : Saginaw
Favorite Fish: : All i can afford
| | Subject: Re: my new tank build 1/31/2010, 11:07 am | |
| Now i can concentrate on finishing the stand and canopy for it.. yeah | |
|
| | |
Guest
Guest
| | Subject: Re: my new tank build 1/31/2010, 12:24 pm | |
|  that looks amazing. |
|
| | |
ilicurtisili
Admin
Posts : 1433
Location : Watauga
| | Subject: Re: my new tank build 1/31/2010, 12:29 pm | |
| thats very nice!!! how much for one? | |
|
| | |
ricardorocks
First Lieutenant


Posts : 671
Location : los angeles
Favorite Fish: : halfmoon bettas and any nice looking cichlids
| | Subject: Re: my new tank build 1/31/2010, 2:44 pm | |
| practice made perfect for yah great job very nice | |
|
| | |
lgsasquatch
Chief Wrnt. Off. 5
Posts : 501
Location : Saginaw
Favorite Fish: : All i can afford
| |
| | |
Sponsored content
| | Subject: Re: my new tank build | |
| |
|
| | |
| | my new tank build | |
|