Hello again!
It is about time I posted another one of my DIY adventures! A few weeks ago I began working on an overflow box. I had original setup a sump (Link found
Here) with an overflow box I got off CL. It worked great on my 75 gallon and the Discus have been very happy. Well after several months it is time to expand the setup and split the Discus up since there are now some clear fast growers.
The task at hand was to add another 75 gallon tank into the mix with the current sump and other tank. Now of course I could go buy an overflow and it would of ran me about $80 new from the store. Only problem... what fun is that?!
To start this project off first we have to gather materials. Now the hardest part of this would be finding acceptable acrylic sheets. They don't need to be as thick as what I used but thicker then what you could normally find at HD or Lowes.
Luckily for me the place where I work was getting rid of some old storm windows which happened to be 1/4 thick acrylic sheets! I won't include the price of sheets in my total cost because I honestly don't know how much it would have cost to get.
Materials: Acrylic sheet: Freebie/zip/zero/zilch/nada
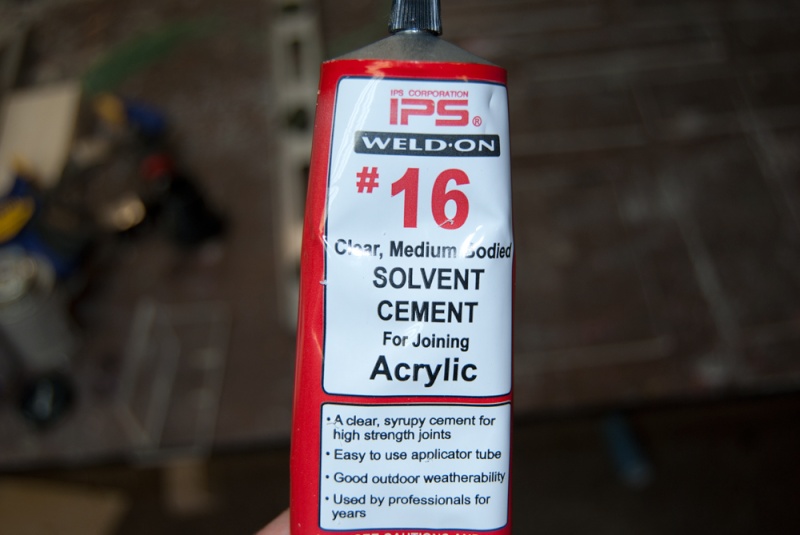
Acrylic solvent: $20 Shipped.
1 1/4 Hole Saw: $10 HD (already had one so nothing for me.)
2 1" Bulk Heads: $15 Bought online
2 1" U tubes $12 Bought online
Toliet seat plastic bolt kit $4 HD
Misc. PVC to finish plumbing on everything.
A set of sliding wood clamps preferable with rubber boots on the ends.
The use of a miter saw/ and circular saw/tape measure/drill (already had these as well)
Total for me was right around $50. Not a huge amount of savings but hey I can custom make it!
Now that I had the supplies all lined up it was time to get started. First thing I did was to copy the dimensions of my current overflow box. This really helps to get everything going. Now this is the step where you would adjust according to your needs. If for instance you wanted to use larger bulk heads you would have to enlarge the measurements to meet your needs.
Next, I took and marked down all the pieces I wished to cut on my sheet. Now I cut out all the pieces one at a time. It is
VERY important that they are smooth and as flat as possible on all edges the will meet another sheet.
 NOTE:
NOTE: I have found when cutting acrylic it takes some practice. A thinker sheet is more forgiving but not impossible to crack. I used a regular blade to cut the sheets. They do make a blade specifically for cutting acrylic but at a premium price and since I don't do this very often... I have found that it is critical to have the sheet well supported. This means that along the edge that is to be cut only slide it off enough that the blade cleans the supporting bench/table underneath. This makes for the least amount of flex in the sheet and a clean cut. When cutting the sheet you will likely find that you get a nice smooth cut but there will be a build up of debris left on the upper part of the sheet. As far as I can tell this is the little shards of the sheet being cut and melting back together. I let it harden for about 20 second then simply break it off.
NOTE 2: The way in which I assembled the pieces meant that the Bottom and both side panels had to be exactly the same width. The reason I used this design is because when I apply my clamps it tightens the whole structure instead of say having the bottom be its own piece and needed to apply a clamp in the other direction.
NOTE 3: There are many different acrylic solvents out there I used Weld-On 16. The benefit of 16 is that it has the consistency of syrup. It is great for filling 'small' bumps or imperfections on a surface. Ideally you would not have any problems with a surface that this would matter but ... this is a DIY project and things happen... The solvent works very fast! Make sure you are ready to go BEFORE applying it to the sheet. I put a thin bead of it down the edge that would go on the flat sheet. This way I knew I would be applying just enough to make contact and not have a mess on my sheet. Place the sheet where you want it to be. Make sure you may the sheet DIRECTLY in its place. If you slide the sheet after it touches the other surface it WILL leave a nice solvent streak that is impossible to remove.
OK Enough with all that!
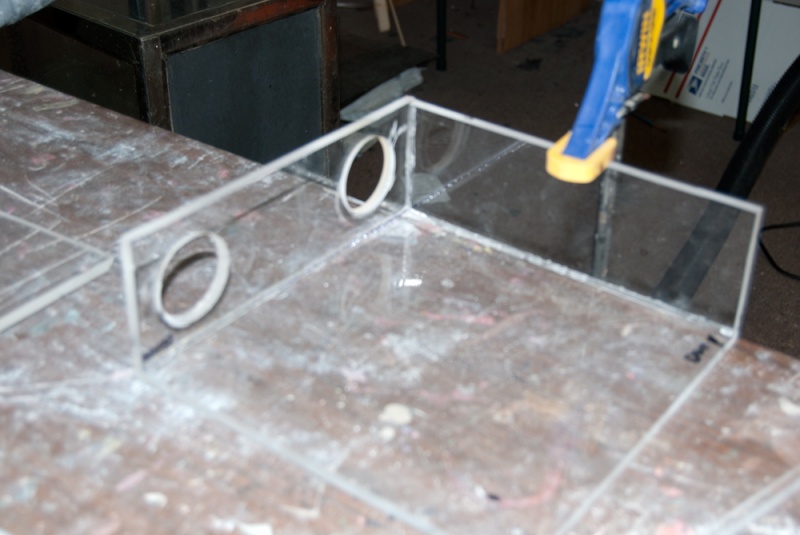
Now before I started to place all the sheets together I drilled my holes for the bulkheads. I do this now because if I mess up and crack the sheet I need to start over and at least this way I only have to redo one sheet!

So I assembled the sheets and let the solvent setup for a few minutes (2-3) At this point it starts to become tacky and will stand on their own, you can start to apply some pressure to the sheets. When clamping the sheets down be sure that the sheets don't slide from their respective positions.
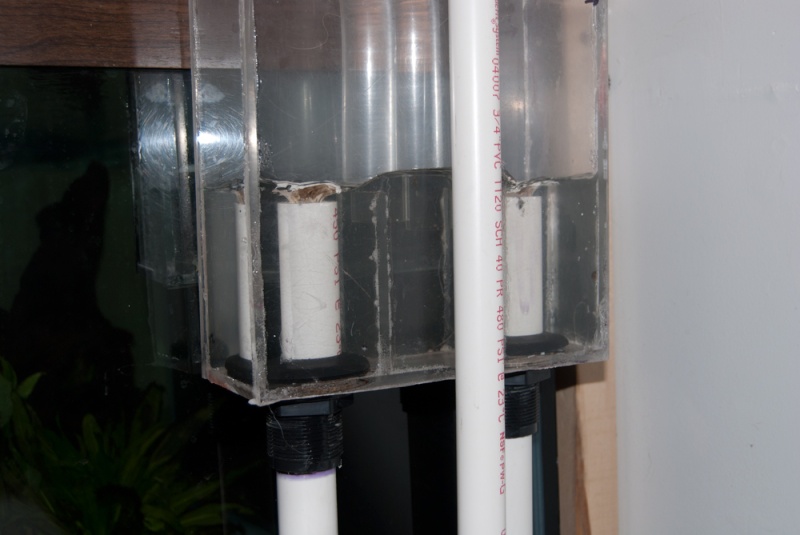
You can see it all coming together now. I took the back and placed the bottom and both sides on at one time. I then placed the siphon box pieces in. Next was the Top of the overflow box. I clamped all this together and let it sit for 24 hours. Next I Added the 'Neck' of the box on. This can be adjusted for the size trim you would have. Then the downward part of the neck that goes into the tank. I added to slots on this part to allow me to adjust the depth of the internal box.

I finished the overflow box and let it sit for a day to allow time for the solvent to cure.
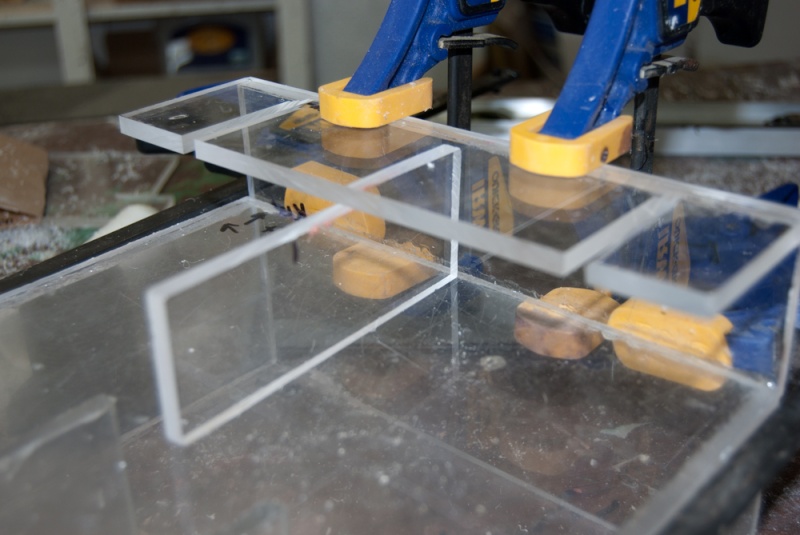
Next I built the internal tank box following the same processes as above. To make the slots on the top of the box I just used the circular saw and made the best cuts i could down on it. This worked surprisingly well!


Now I used the plastic toilet seat bolt kit to tie the internal box to the neck of the overflow. I cut off the end of the bolts so they didn't stick out so much but they worked great!
I cut out two small 1" sections of pipe to go in the overflow box. These help to raise the water level that overflows of the siphon section in the box. It lowers the noise level considerable.

Next up, finish plumbing and route pipes to sump. Then I placed in the U tubes. Started it all up and away it went.


 EDIT
EDITA few things I wanted to add. When you make your siphon box it would be a good idea to have the U tubes in hand. You must make sure the the U tubes extend BELOW the upper lip of the siphon box. If this is not done, when you lose power you will lose siphon and depending on how your sump is setup could very well overflow the tank or at the very least have no filtration until you get home.
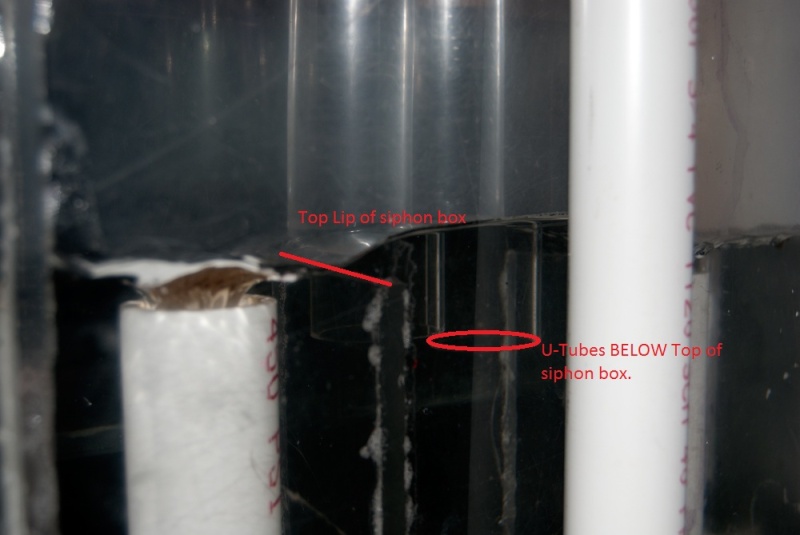
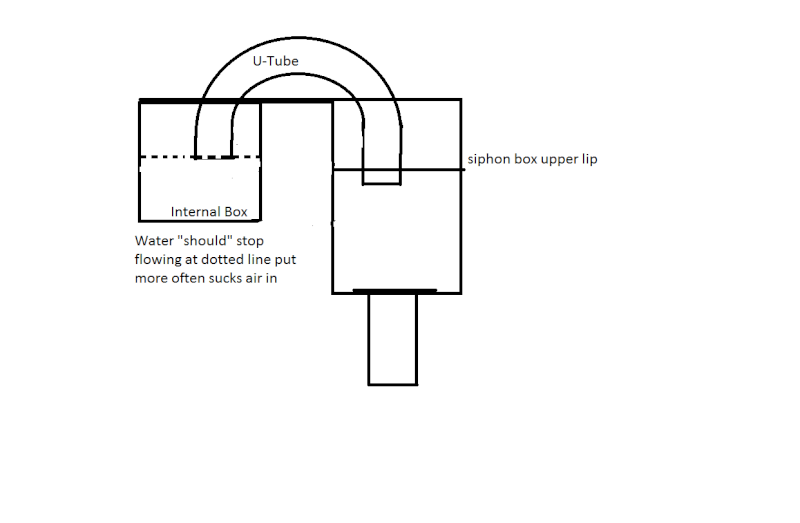
The U tubes I bought were equal length, this I have found to be a great advantage. In the other overflow, one side of the tubes came shorter then the other. I believe this was so they could use a smaller internal box. The problem is that while the siphon 'should' stop when water stops entering the internal box (at the upper slots) the force of the water flowing pulls some air into the system, much like you see when vacuuming out a tank until it is empty (it will suck air with the water at the very end) This happens because one end of the tube is lower then the other and creates a more forceful pull. (good normally but bad for maintaining siphon)
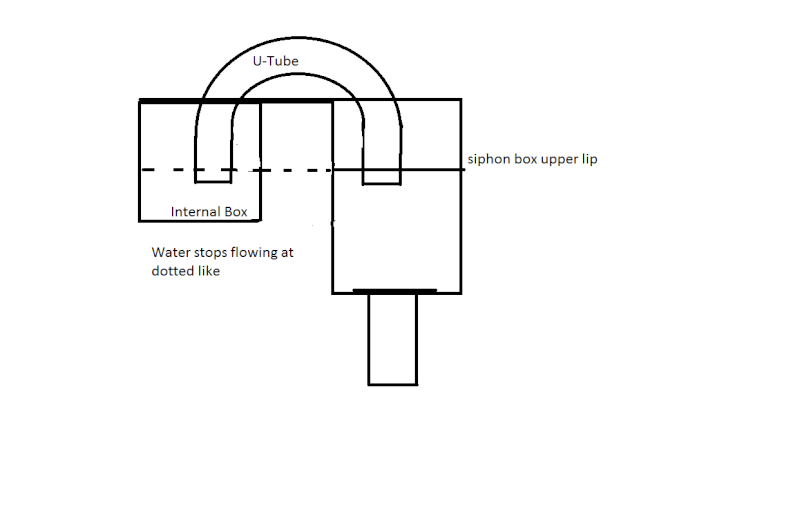
By using equal length tubes when the water in the internal box approaches the level equal to the top of the siphon box it stops flowing. This maintains water in the tubes and will restart the siphon effect once enough water enters the internal box.
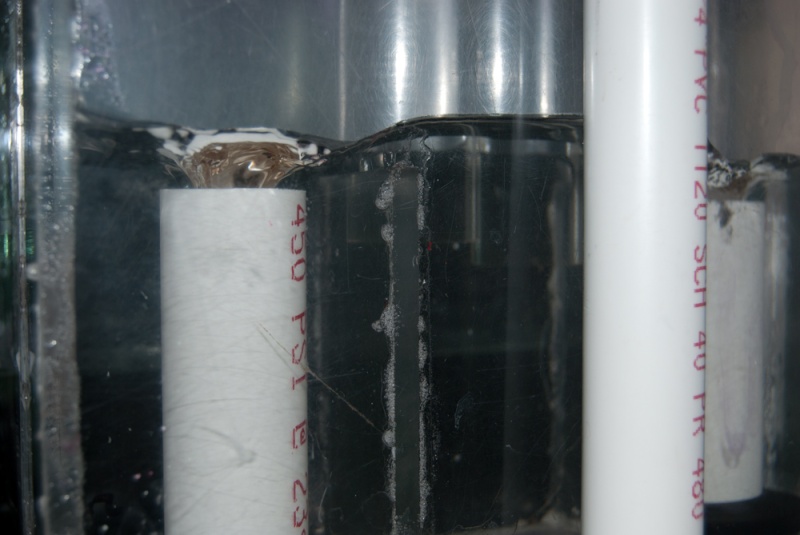
See pictures below for visual explanation of above hehe.
GOOD
BAD
END EDIT
Total time spent 2 afternoons and more time spent figuring out what the heck I wanted to do then actually doing anything...
Hope everyone finds this informative and if you want any more information just let me know!